Users & Sign-in
Users
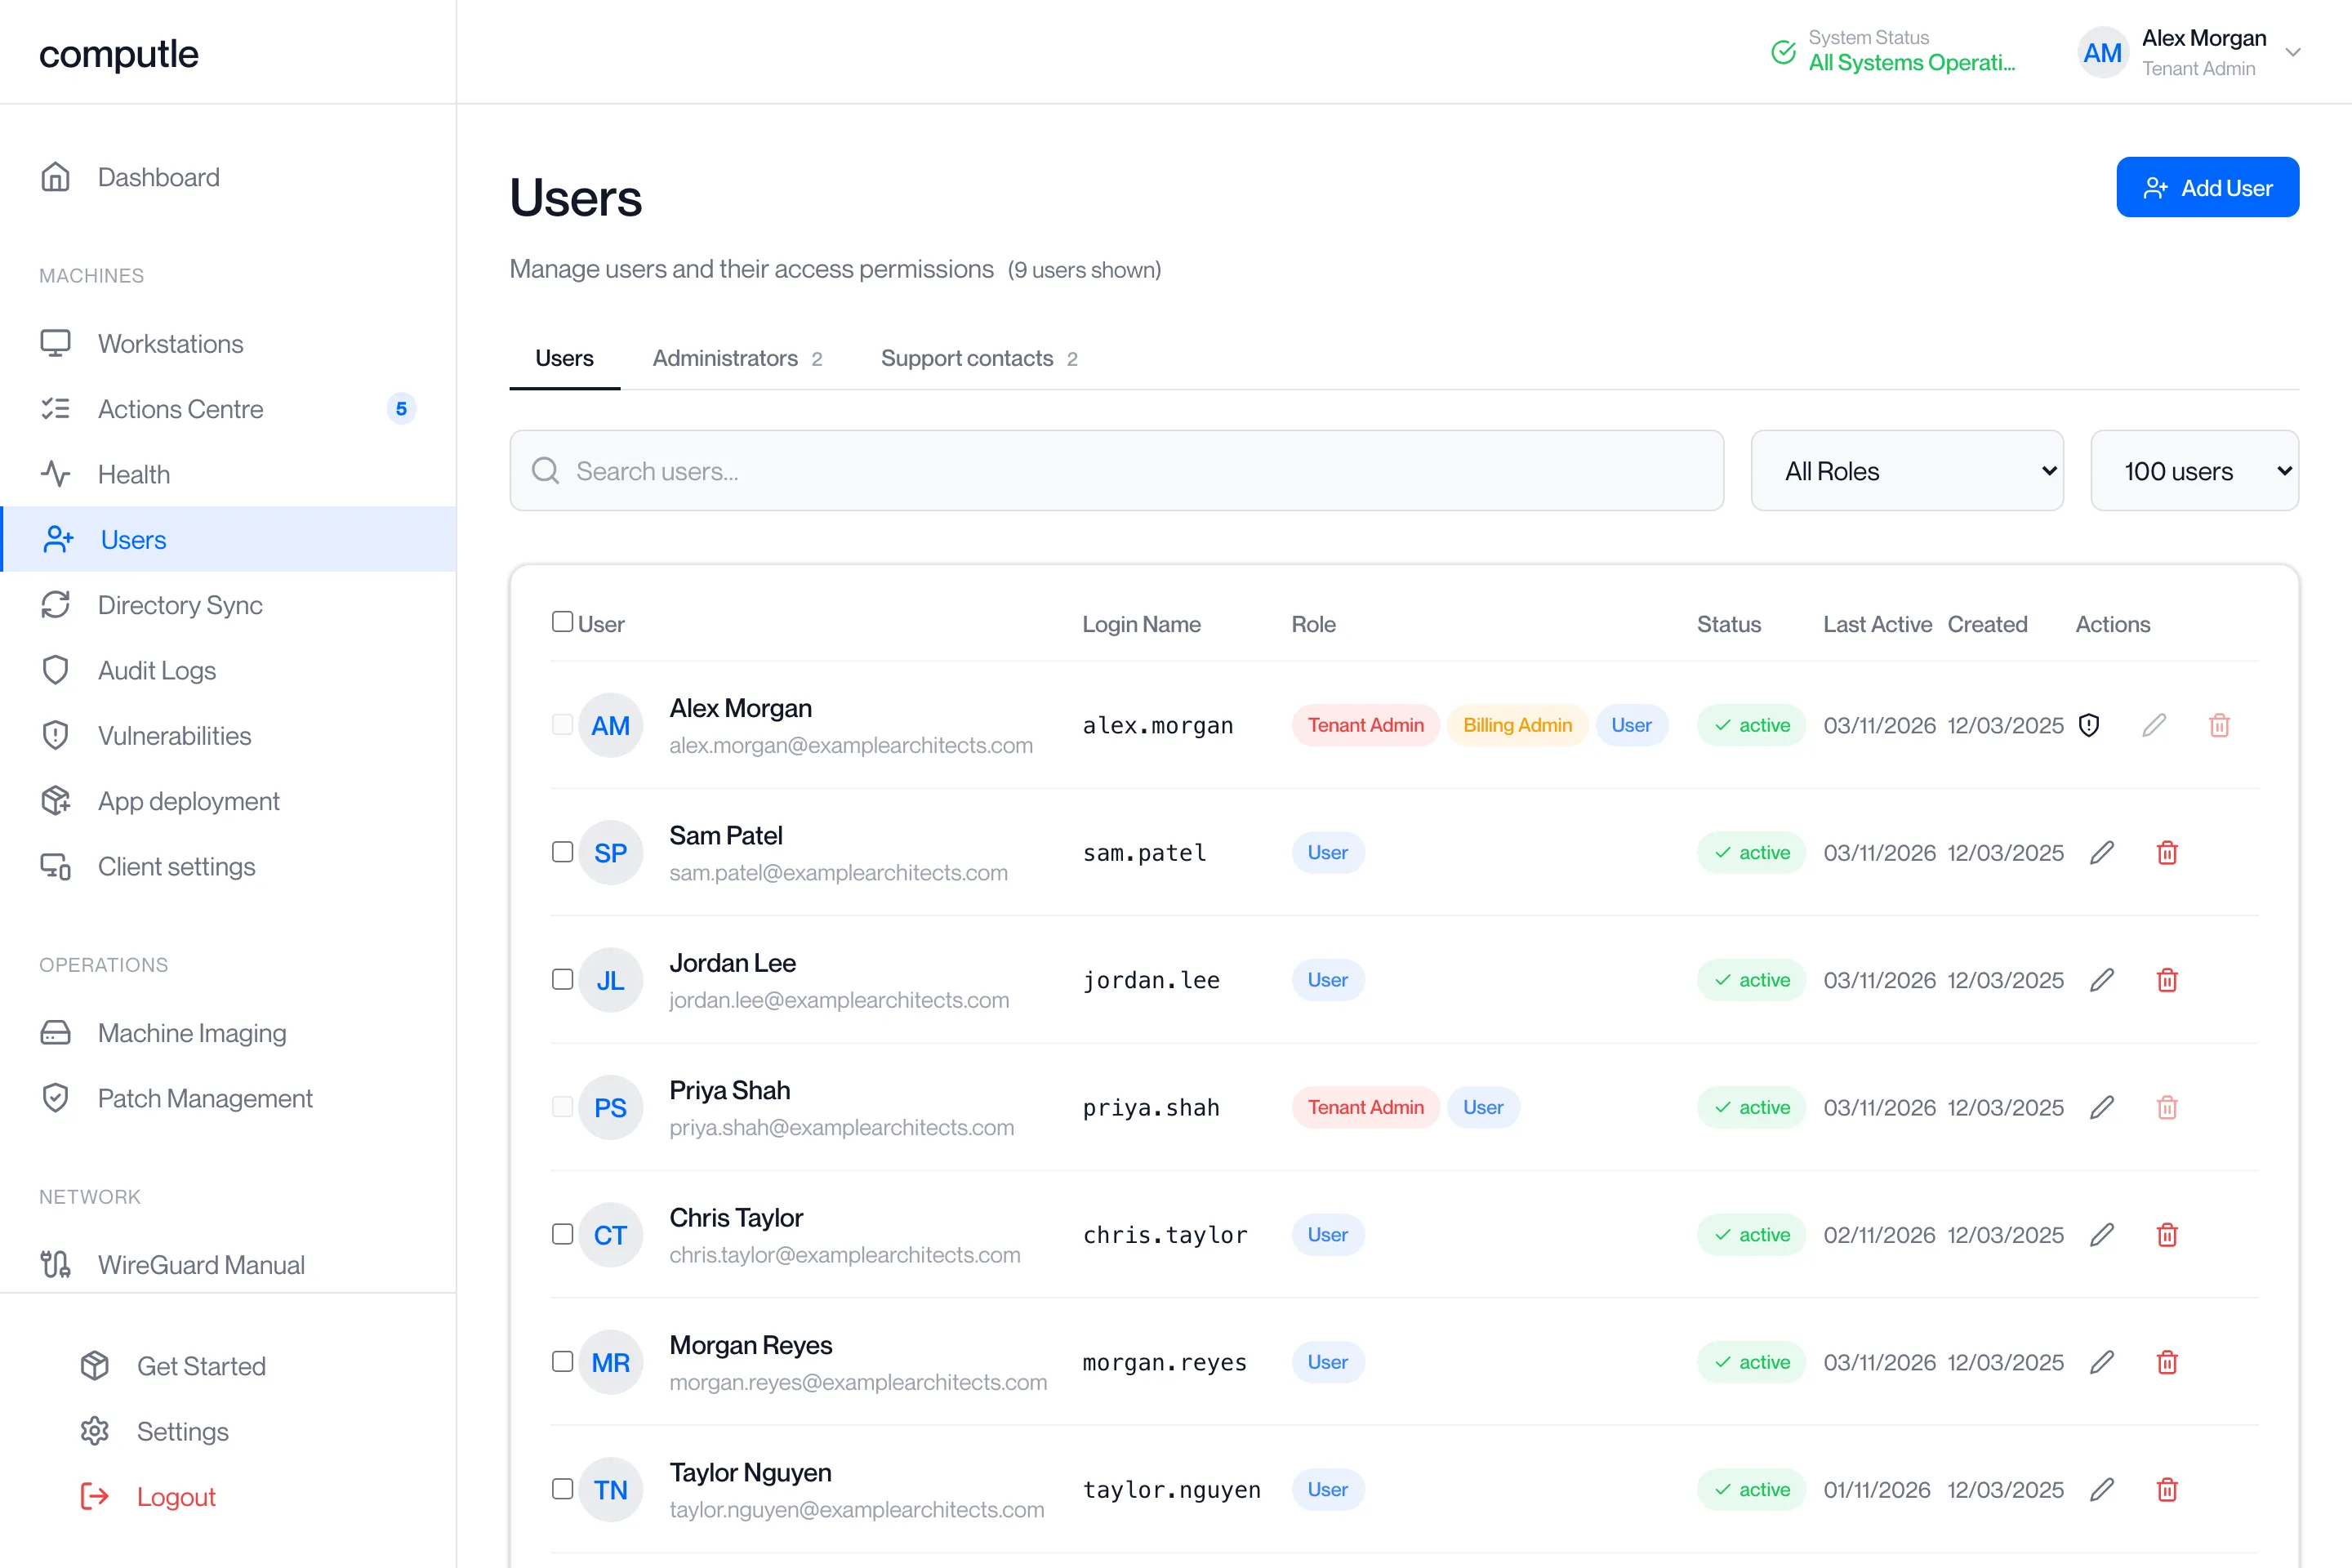
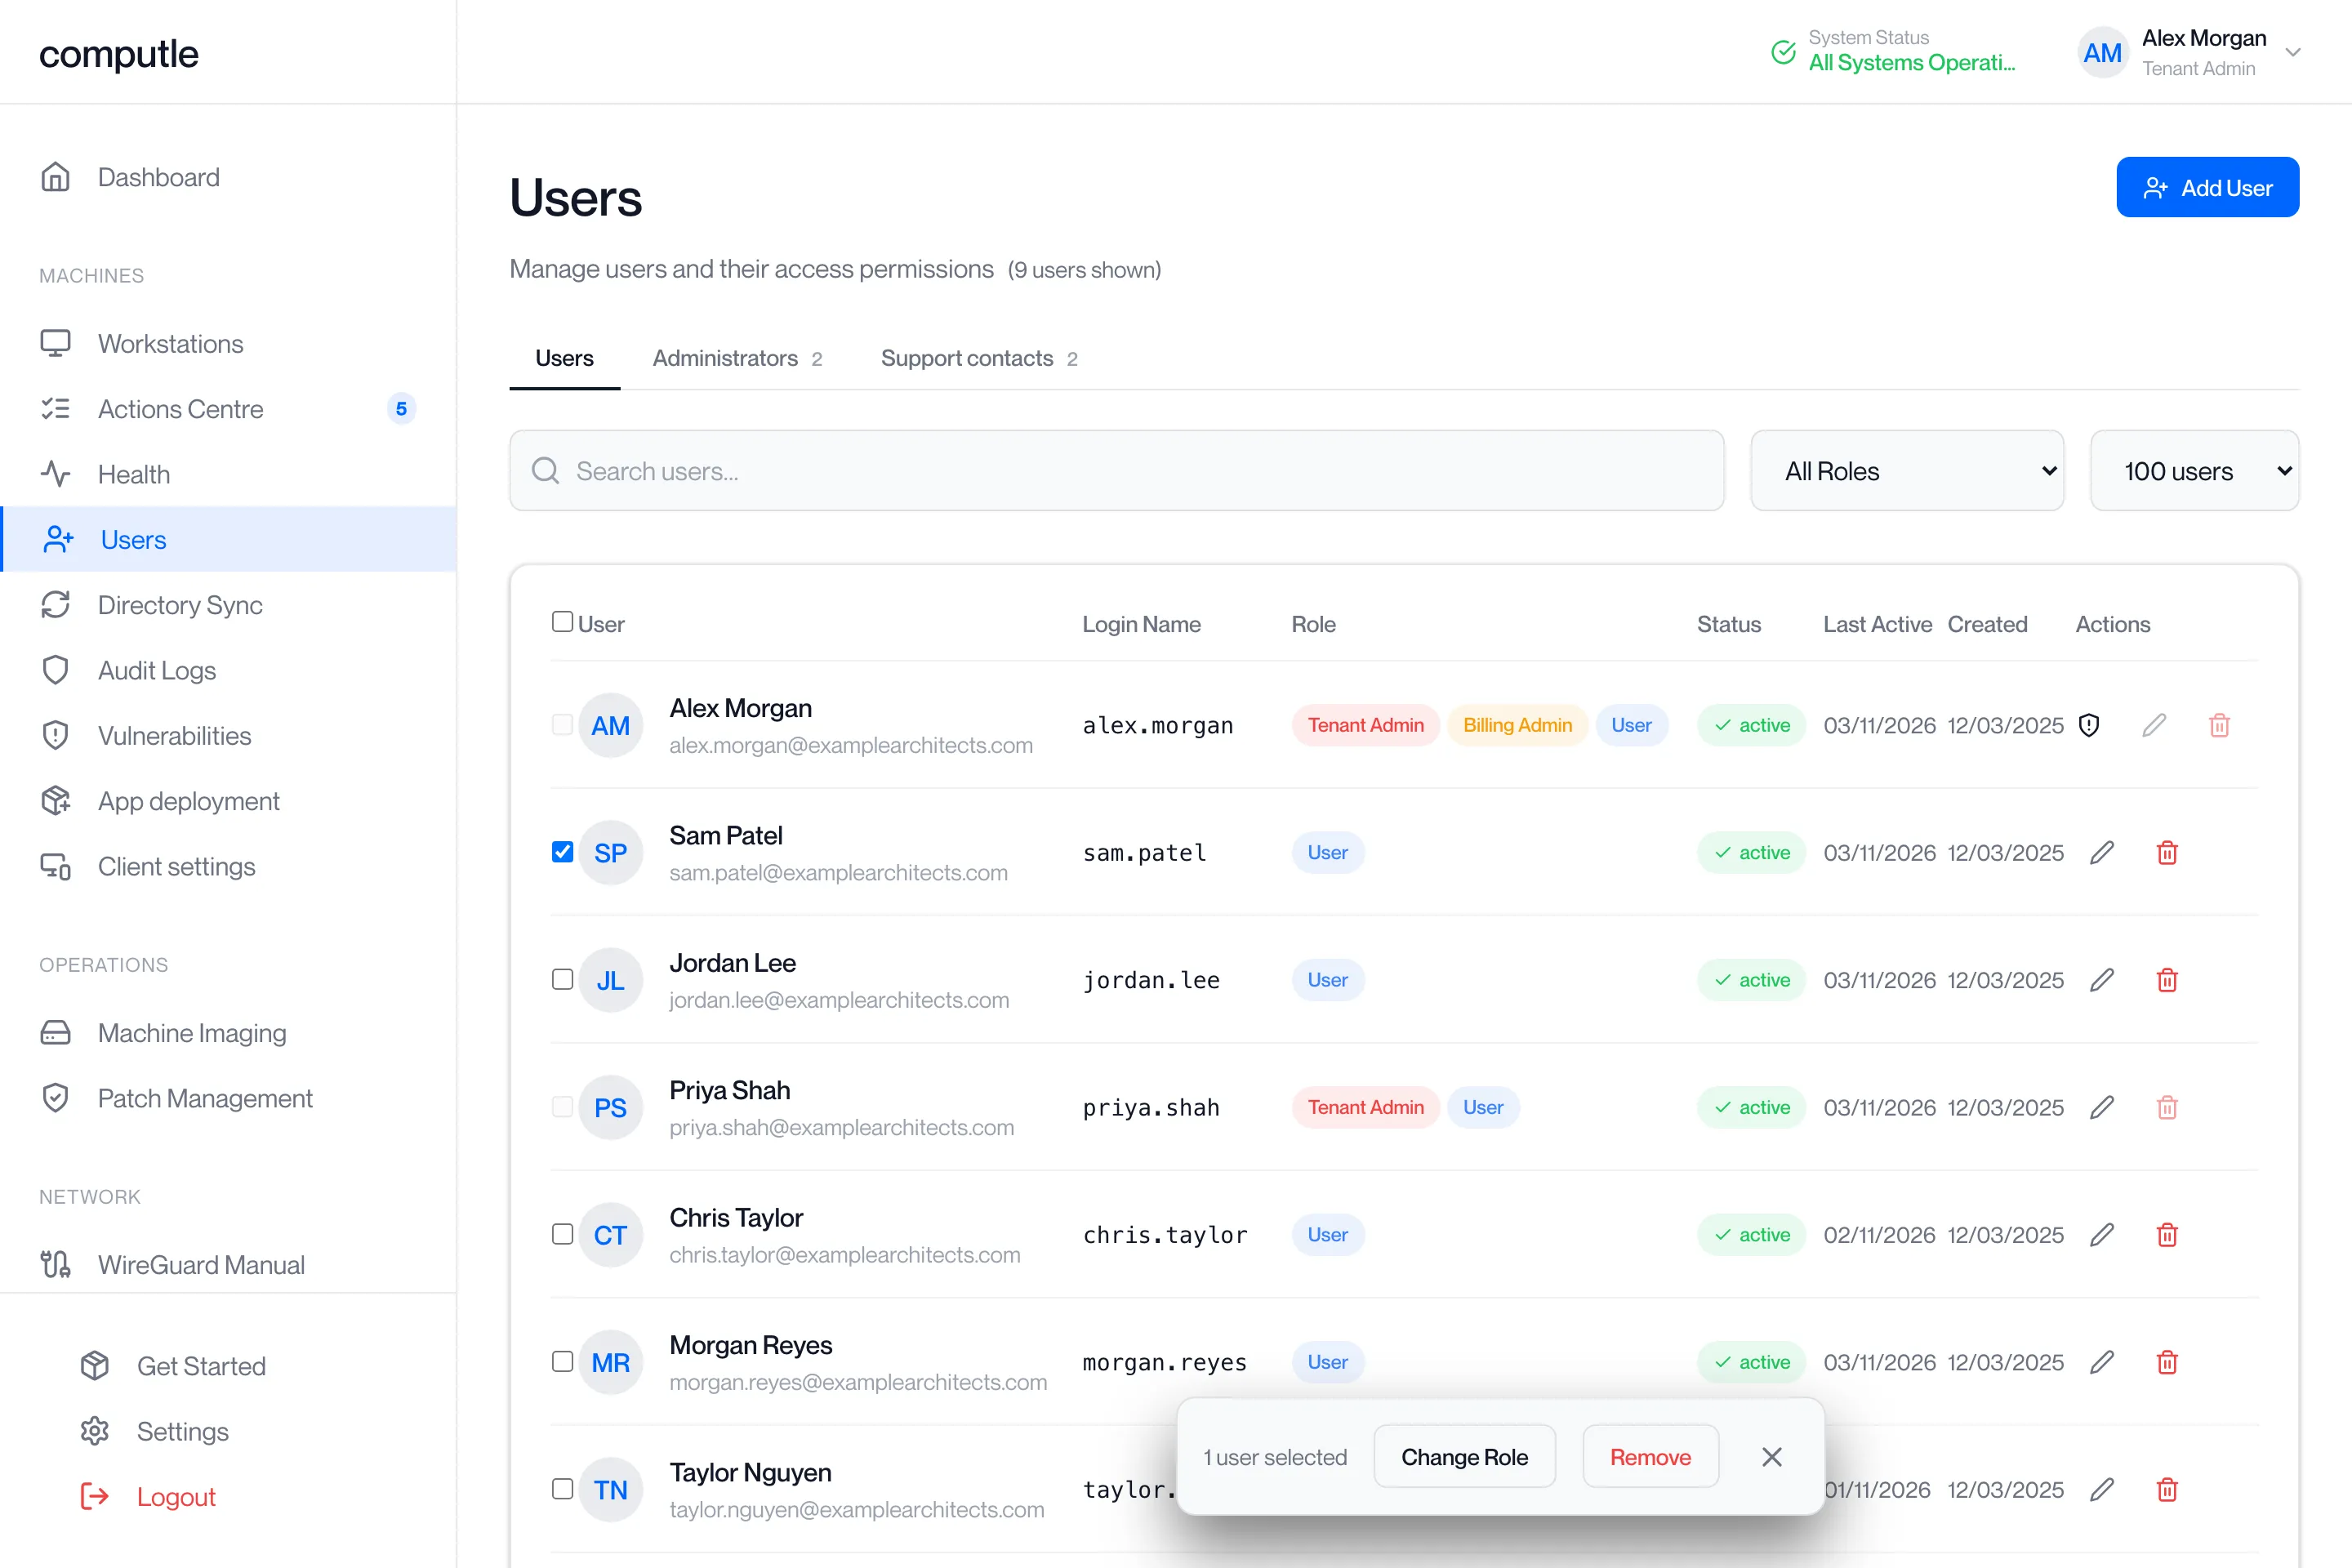
The Users page lists everyone in your organisation who can sign in to the Computle Portal or the Remotle app. It is where you invite a new starter, make someone an administrator, remove a leaver, and keep the list of people Computle emails when a workstation has a problem.
Open Users under Machines in the portal sidebar. The page needs the Tenant Admin role.
The tabs
Section titled “The tabs”| Tab | What it shows |
|---|---|
| Users | Everyone in your organisation. The heading shows how many match, for example “(6 users shown)”. |
| Administrators | Only users with the Tenant Admin role. The number next to the tab is the count. |
| Support contacts | The email addresses Computle sends automatic alerts to. The number next to the tab is the count. See Support contacts. |
| Single Sign-On, SSO diagnostics | Shown only when Single Sign-On is available to your organisation. Connect Microsoft Entra, choose the device group and check each workstation’s readiness. See Single Sign-On. |
| Entra join | Shown only when Entra join is available to your organisation. Join a built workstation to your Microsoft Entra directory. See Entra join. |
Links from other pages can open a tab directly, for example /users?tab=support-contacts.
The columns
Section titled “The columns”| Column | What it shows |
|---|---|
| User | The person’s initials, name and email address. “Unnamed User” when no name has been recorded. |
| Login Name | The Windows sign-in name Computle has on record for the person, when there is one. A dash otherwise. Directory Sync fills this in from your directory. |
| Role | One badge per role. See Roles. |
| Status | active: the person can sign in. invited: an invitation has been sent and the person has not signed in yet. disabled: the account has been turned off and the person cannot sign in. |
| Last Active | The date the person last signed in, or the date the account was created if they have not signed in since. |
| Created | The date the account was created. |
| Actions | A shield icon marks your own account. The pencil opens Manage Roles; the bin removes the user. A greyed-out icon means the action is not allowed for that user; see Rules. |
Search and filter
Section titled “Search and filter”| Control | What it does |
|---|---|
| Search users… | Matches the name, email address or login name as you type. |
| All Roles | Shows only users with one role: Users, Tenant Admins, Billing Admins, Viewers or Ticket viewers. |
| 100 users | How many users the page loads: 50, 100, 200 or 500. |
The list refreshes itself every 30 seconds.
Every account has the User role. The other roles stack on top of it, so one person can hold several at once. Roles apply within your organisation only.
| Role | What it allows |
|---|---|
| User | Sign in and use the workstations assigned to them. Every account has this. |
| Tenant Admin | Everything under Machines in the portal: Workstations, Actions Centre, Health, Users, Directory Sync, Audit Logs, Client settings and Support. A Tenant Admin does not see Billing. |
| Billing Admin | The Billing page. A Billing Admin does not see the Machines pages. |
| Viewer | Can be granted in Manage Roles. No portal page requires it. |
| Ticket viewer | The Support page only. Someone who holds Ticket viewer and nothing above it sees Support and nothing else when they sign in to the portal, and cannot open bug reports. |
Billing is kept apart from Tenant Admin so that an outsourced IT provider can run your workstations without seeing your invoices. Grant both roles to one person if you want them to have both.
Change someone’s roles
Section titled “Change someone’s roles”-
Find the user and click the pencil icon on their row.
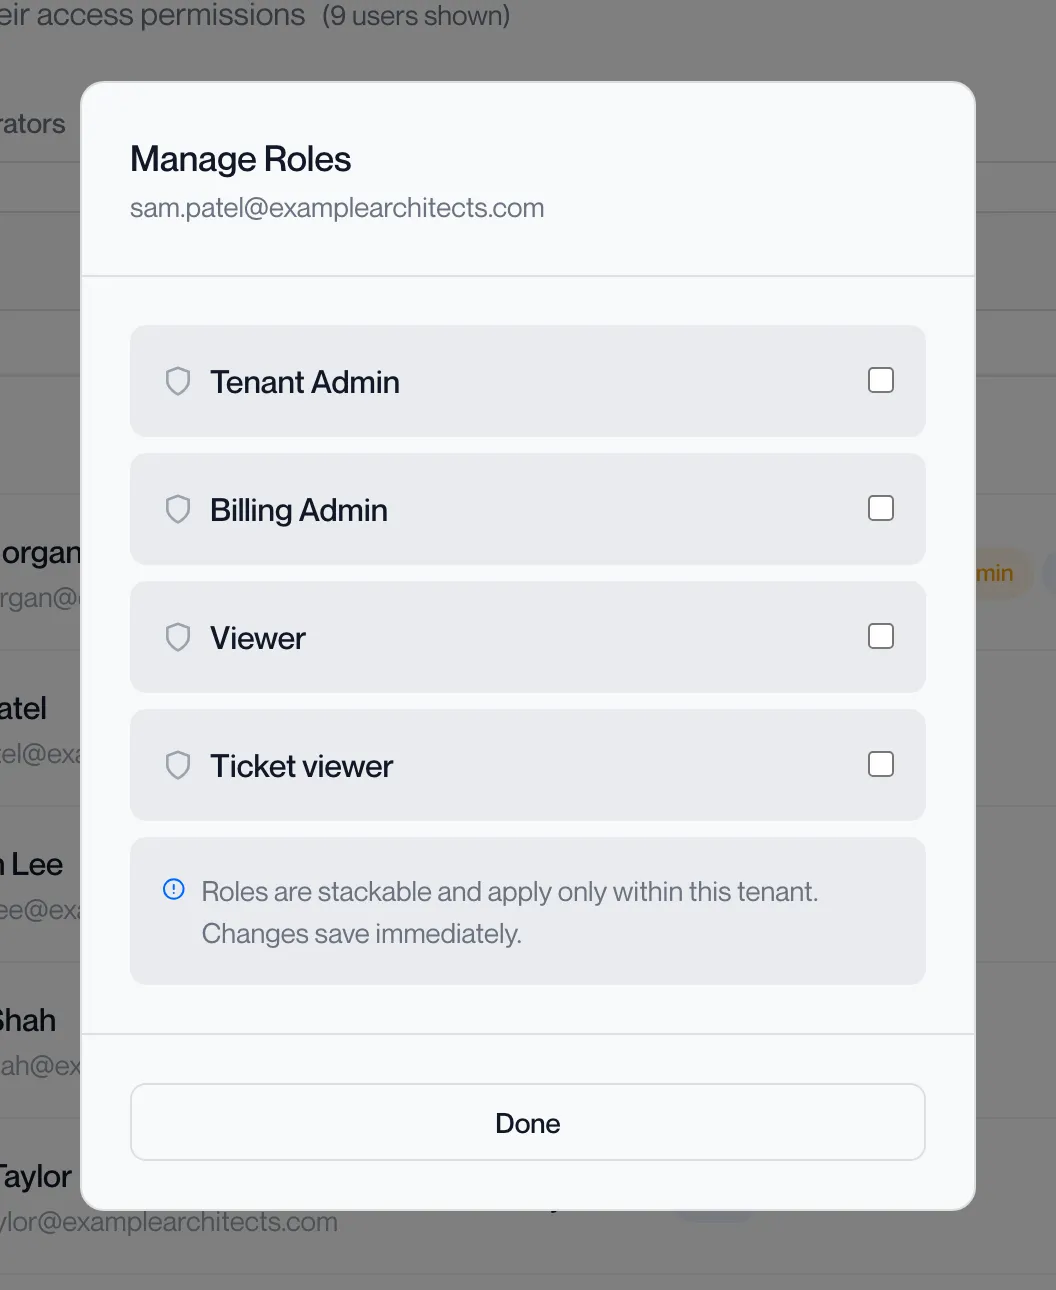
The Manage Roles dialog opens with a switch for Tenant Admin, Billing Admin, Viewer and Ticket viewer.
-
Tick or untick a role.
The portal shows “Tenant Admin granted” or “Tenant Admin removed” (and the same for the other roles). The dialog says “Roles are stackable and apply only within this tenant. Changes save immediately.” There is no Save button.
-
Click Done.
Whenever Tenant Admin is granted or removed, Computle emails every administrator in your organisation, so an administrator cannot be added quietly. Removing a role signs that person out of every existing session.
Invite a user
Section titled “Invite a user”-
Click Add User on the Users tab.
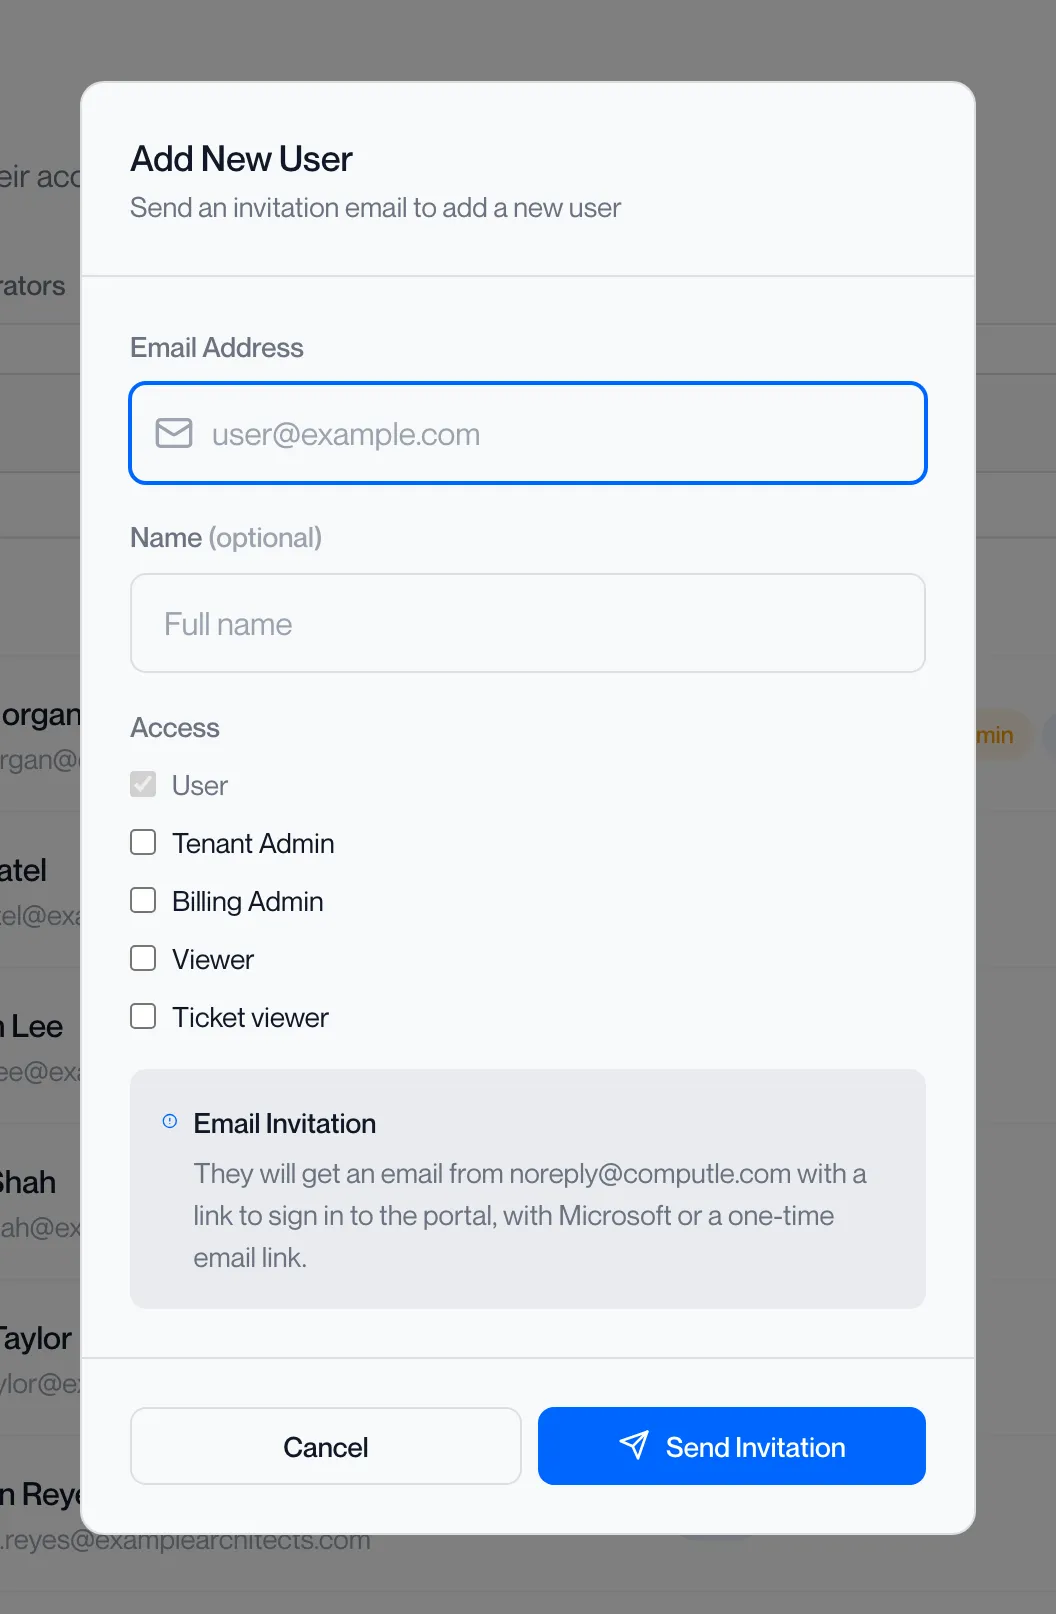
The Add New User dialog opens.
-
Enter the person’s email address, and a name if you want one shown.
-
Tick any extra roles under Access.
User is always ticked. Tick Tenant Admin, Billing Admin, Viewer or Ticket viewer to grant them from the start.
-
Click Send Invitation.
The portal shows “Invitation sent to [email]”. The person appears in the list with the status invited until they first sign in.
The dialog says: “They will get an email from noreply@computle.com with a link to sign in to the portal, with Microsoft or a one-time email link.” Which of those two methods they can use depends on your Sign-in Methods.
| Message | What it means |
|---|---|
| “Please enter a valid email address” | The address is not in the form name@domain. |
| “[email] already has access. Change their roles from the user list.” | The person is already in your organisation. Use the pencil icon instead. |
| “[email] belongs to another organisation and cannot be invited here.” | The address is registered with a different Computle organisation. |
| “An invitation was sent to [email] less than 10 minutes ago.” | Wait before sending it again. Sending again to an invited person who has not signed in shows “Invitation sent again to [email]”. |
| “Your organisation has sent 50 invitations in the last hour. Try again later.” | The hourly limit has been reached. |
| “[email] was added, but the invitation email could not be sent. Try again in a few minutes.” | The account exists and the person can sign in with their Microsoft work account straight away. Send the invitation again to retry the email. |
Send an invitation again
Section titled “Send an invitation again”-
Click Add User and enter the same email address.
Use this for a person whose status is still invited and who has not received, or has lost, the email.
-
Click Send Invitation.
The portal shows “Invitation sent again to [email]”. If the last invitation went out less than 10 minutes ago, the portal says “An invitation was sent to [email] less than 10 minutes ago.”; wait and try again.
Remove a user
Section titled “Remove a user”-
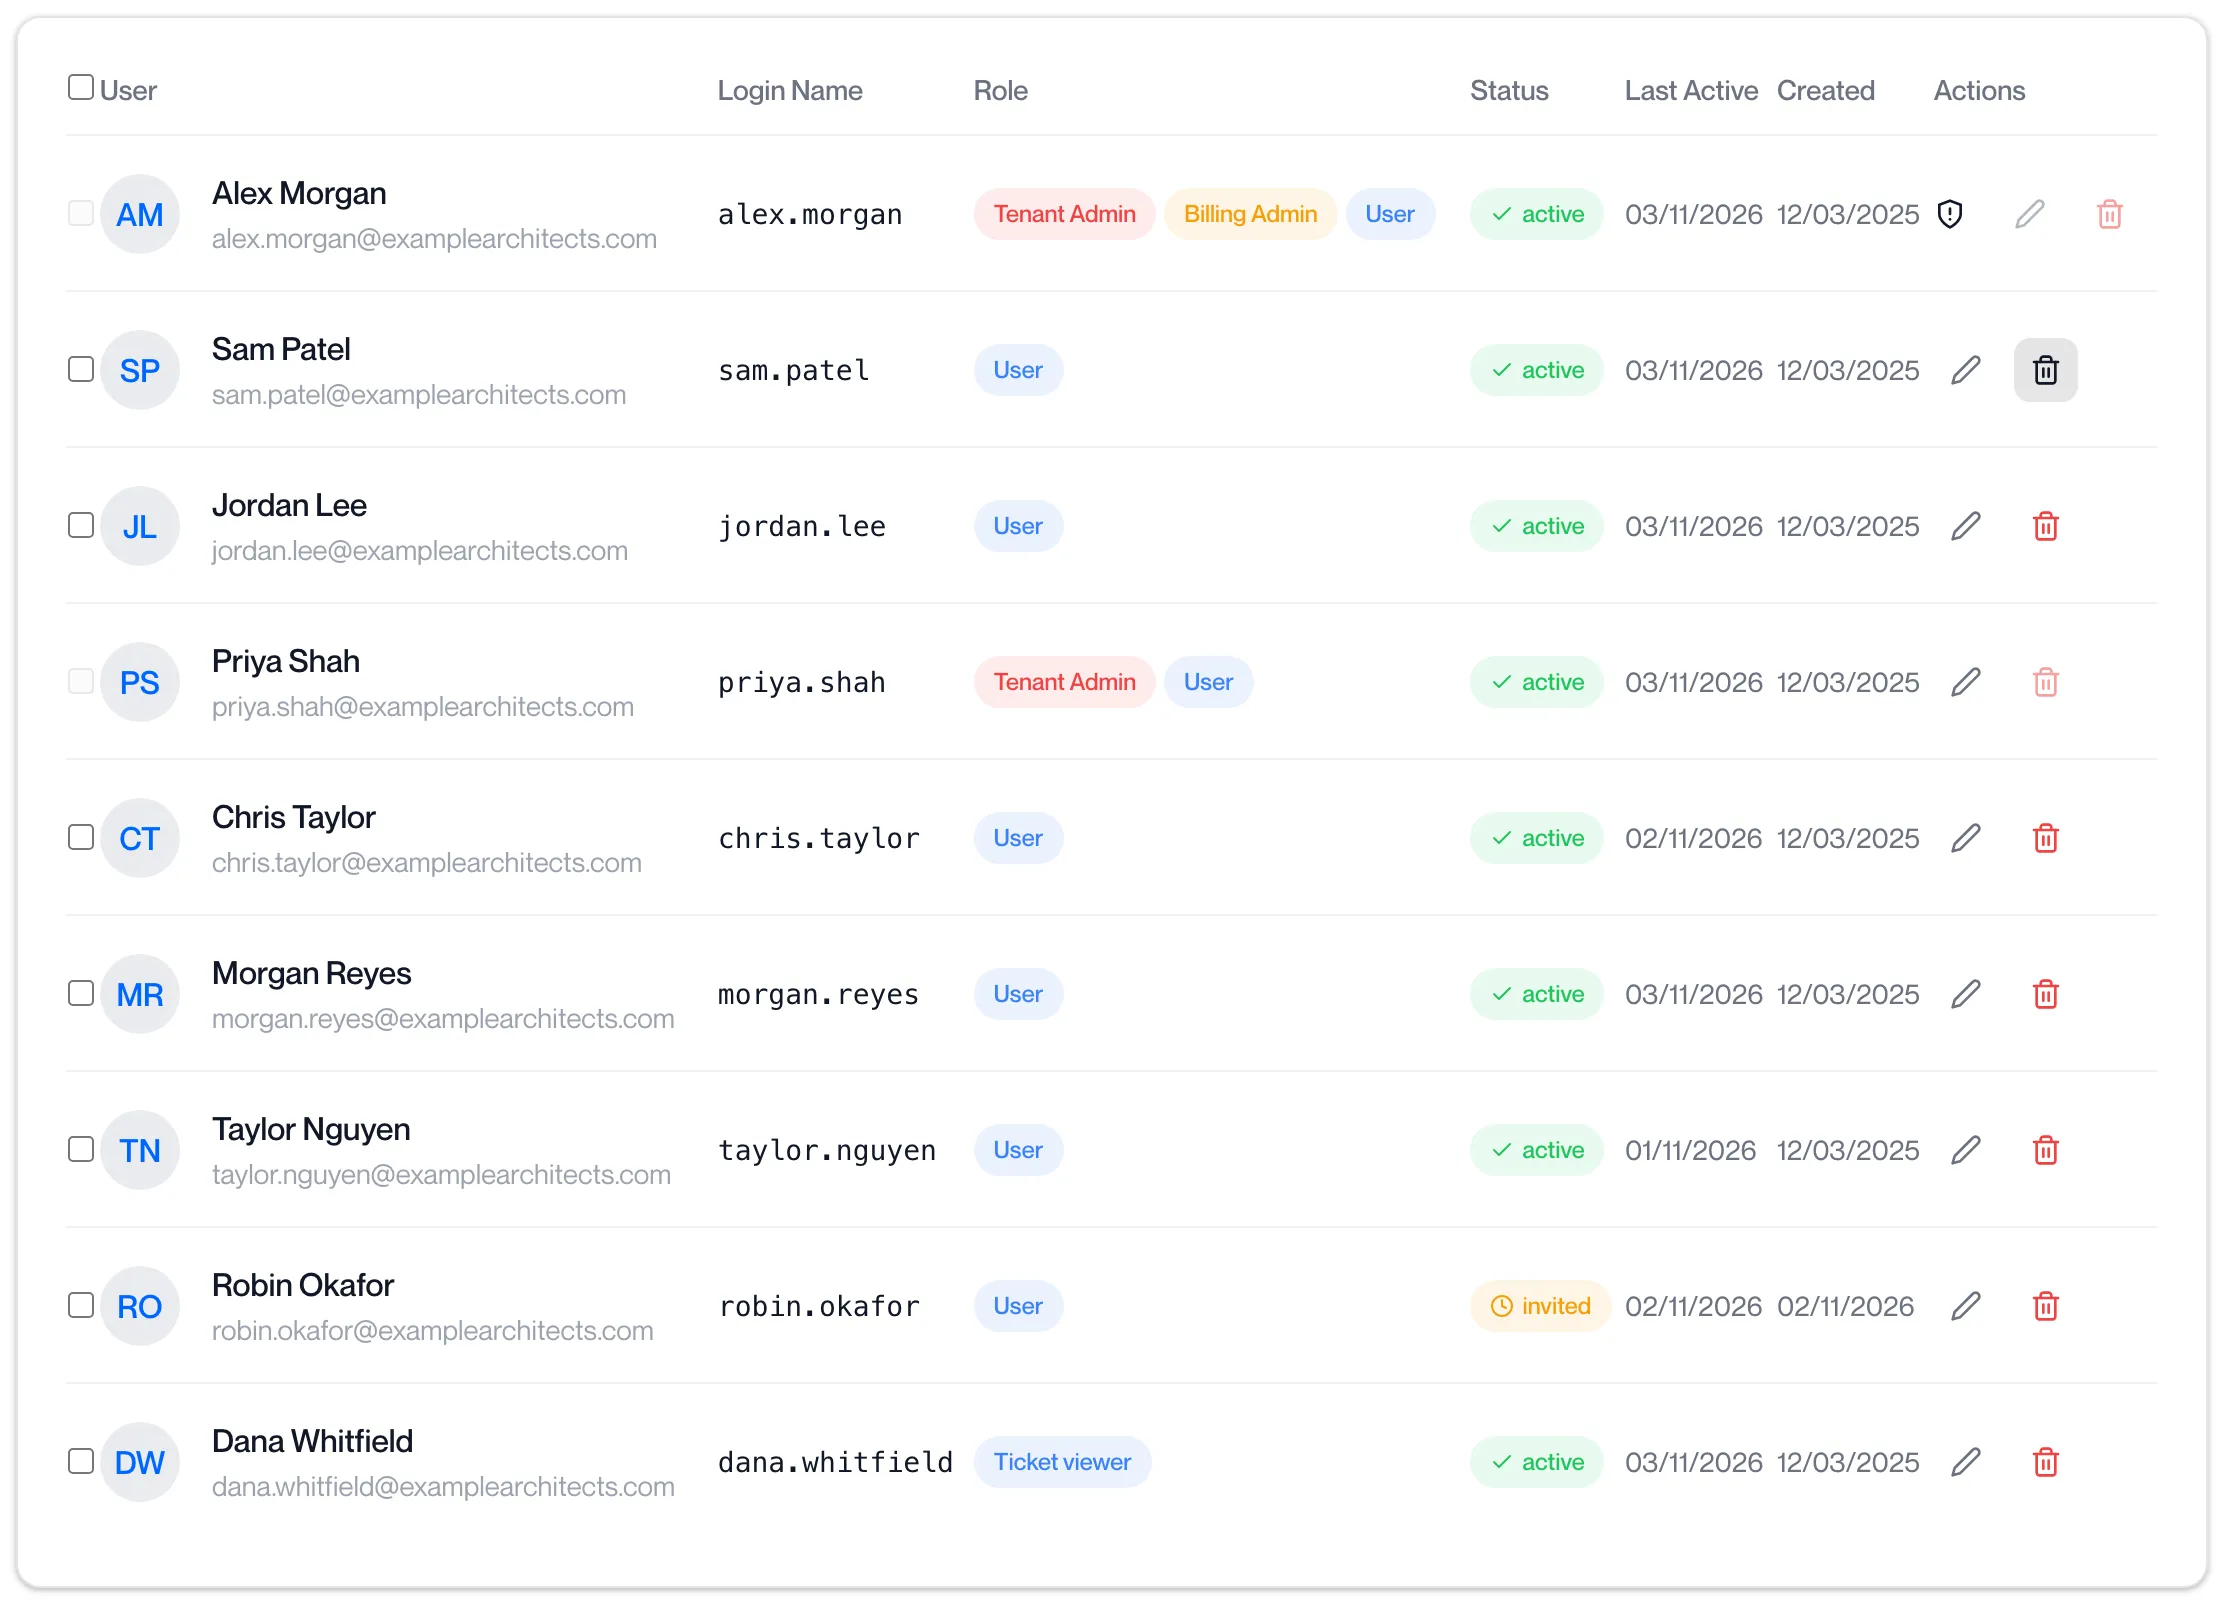
Find the user and click the bin icon on their row.
The icon is greyed out, with the hint “Cannot delete this user”, on your own row and on other Tenant Admins; see Rules.
-
Confirm “Are you sure you want to remove [email]? This action cannot be undone.”
Click OK in the browser’s confirmation.
-
The portal shows “User removed successfully”.
The row disappears from the list.
Remove several users at once
Section titled “Remove several users at once”-
Tick the box at the left of each user’s row.
A bar appears at the bottom of the page reading “N users selected”. The tick box is greyed out on rows you cannot remove.
-
Click Remove in the bar.
Confirm “Are you sure you want to remove N users? This action cannot be undone.” The portal shows “User removed successfully” and the rows disappear.
The Change Role button in the same bar shows “Bulk role change coming soon”. Change roles one user at a time with the pencil icon.
| You cannot | What you see |
|---|---|
| Change your own roles | The pencil is greyed out on your own row with the hint “Cannot edit this user”, so an administrator cannot lock themselves out. |
| Remove yourself | “You cannot delete your own account” |
| Remove another Tenant Admin | “You cannot delete other tenant administrators”. Remove their Tenant Admin role first, then remove the user. |
| Remove the only Tenant Admin | “Cannot delete the last tenant administrator” |
| Remove the Tenant Admin role from the last administrator | “Cannot remove the last tenant administrator”. Grant the role to someone else first. |
Support contacts
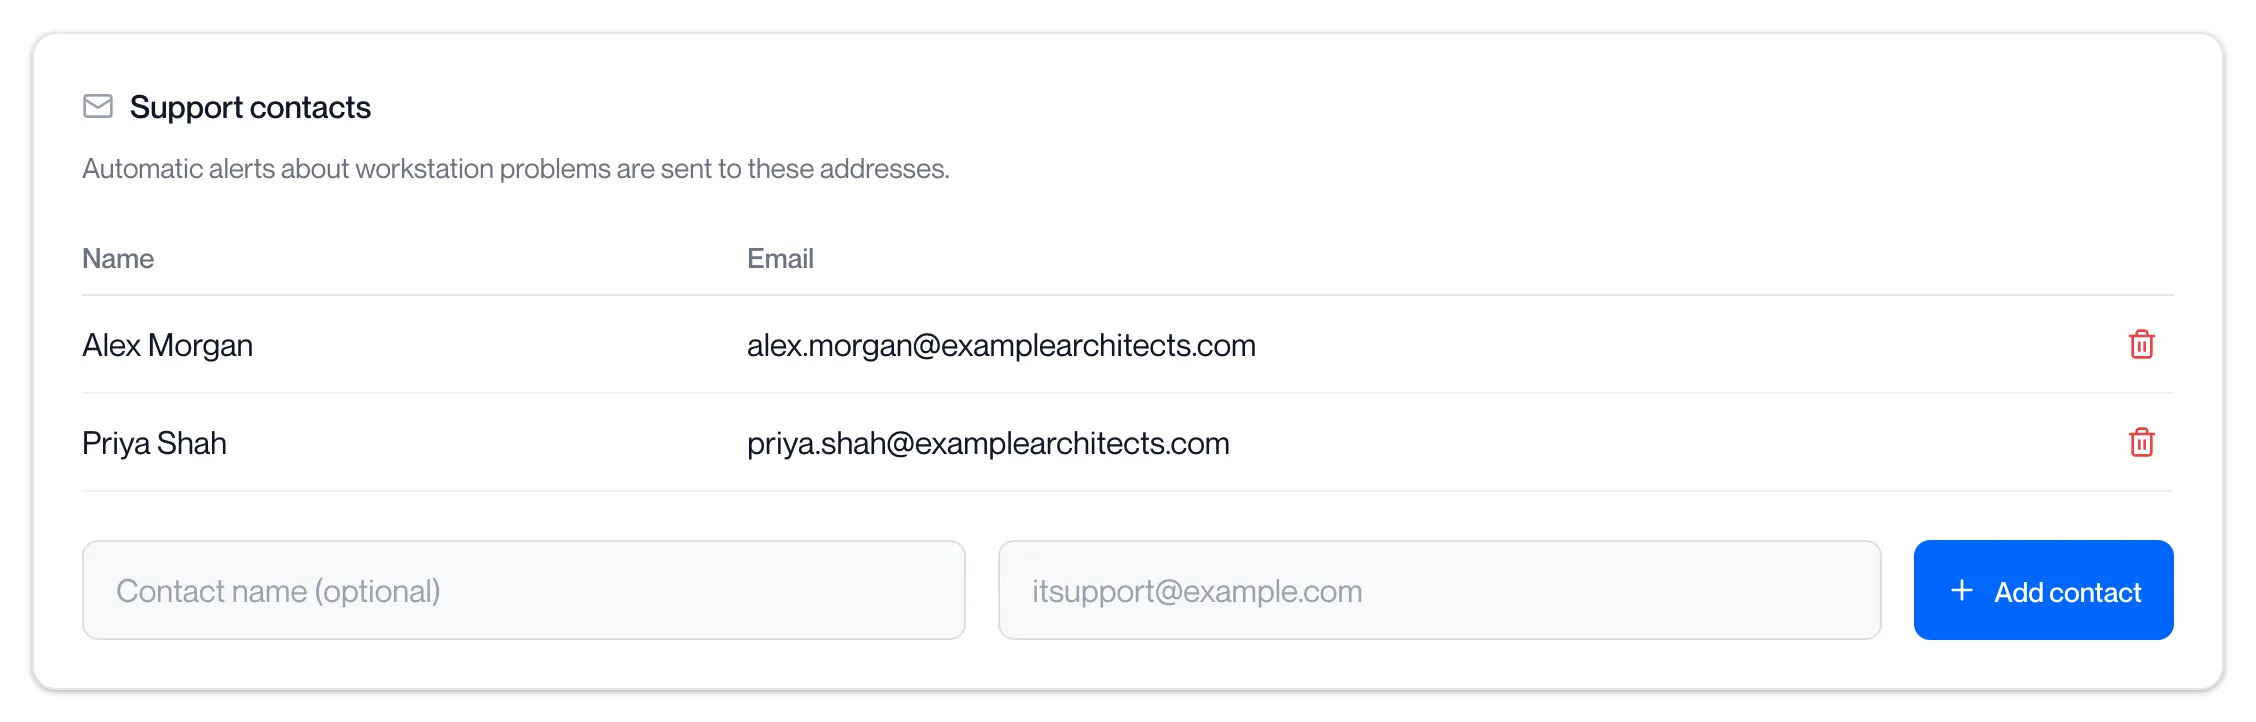
Section titled “Support contacts”The Support contacts tab lists the email addresses that receive automatic alerts about workstation problems. Keep it to the people who act on them, such as your IT service desk.
-
Enter a name (optional) and the email address.
-
Click Add contact, or press Enter in the email box.
The portal shows “Support contacts saved”. The list saves as soon as it changes.
| Rule | Message |
|---|---|
| The address must be a valid email address | “Enter a valid email address” |
| An address can appear once | “That address is already on the list” |
| Up to 10 contacts | “You can add up to 10 contacts” |
Remove a support contact
Section titled “Remove a support contact”-
Click the bin icon at the end of the contact’s row.
There is no confirmation. The contact is removed from the list at once.
-
The portal shows “Support contacts saved”.
If the save fails the portal says “Could not save the support contacts. Please try again.” and the list is unchanged.
Related pages
Section titled “Related pages”Questions
Section titled “Questions”A new starter is not in the list. What do I do?
Section titled “A new starter is not in the list. What do I do?”Invite them with Add User, or ask them to sign in to the portal or the Remotle app with their Microsoft work account. If your organisation uses Directory Sync, they are added at the next sync.
Can our outsourced IT provider be administrators?
Section titled “Can our outsourced IT provider be administrators?”Yes. Grant their accounts Tenant Admin. They will not see Billing unless you also grant Billing Admin.
Who should hold Ticket viewer?
Section titled “Who should hold Ticket viewer?”Someone who needs to raise and follow support tickets with Computle without running workstations, such as a service desk. When they sign in to the portal they see the Support page only.
What does a disabled status mean?
Section titled “What does a disabled status mean?”The account has been turned off and the person cannot sign in. Directory Sync can disable accounts for people removed from your directory; see Directory Sync. Contact your account manager to re-enable an account.
Who receives the support contact emails?
Section titled “Who receives the support contact emails?”Only the addresses on the Support contacts tab. End users are not emailed about workstation problems.